The green one is from last year and i've made the new ones in the same style. Different base color but with the same black plinth and interior decor. The mirror received a velvet lining, but besides that they all match.
Showing posts with label dolphin table. Show all posts
spot the differences
The drawing on the left was my plan and only guideline. Most importantly for me was to find the right feel and that rough sketch captured that essence. There was some mathematics involved, but I've made this piece more by eye and gut feeling the anything else. It's only 0.5 mm out in hight, compared to the initial drawing. Besides that there is no comparison, it doesn't even come close :)
Just for fun i've added a few shells, to give that tiny little extra detail.
Unfortunately the table top cracked across a color line, just a short while ago. I've no picture of that because the brittle edges are so easily damaged, i immediately glued it back together! To show you the fractured marble could be saved the shiny proof of what elbow grease and micro mesh can do.
cutting curves
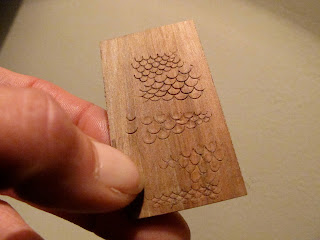
Few weeks ago I stocked up my tool box with a few new tools. I had some jobs in mind (like scaling fish :) and this girl is always over the moon when when she has an excuse to buy delicious new tools! I ordered a selection of what I thought could work to simulate the scales. I tested them out and came up with these gouges above, just the right curve and only 2 and 3 mm wide.
The shape of the curve is expressed in sweep. Sweep 1 being a flat straight chisel, 2 being a very gentle scoop, and these two for instance are sweep 8 and 9. So if you look at a catalogue and it talks about a gouge 5/8 the first number tells you the sweep or "roundness". The second number, in this case 8, will tell you it is 8 mm wide at its widest point.
When the curve of the cutting edge becomes sharper then a circle they are referred to as veiners. The ones you see here are sweep 11, and from left to right 3, 1 and 0.5 mm.
All these are made by Pfeil in Switserland, and easily available online. Also known as linoleum cutters cos of their size, i prefer these small palm cutters with their round handle. I've got small hands and these fit so well they give me good grip and direction. Another great maker here in Europe is Kirschen from Germany, also know as Two Cherries in English speaking countries. Little bit more expensive but again a large choice in shapes and sizes. Also very neat bend carvers for deep and limited spaced work.
They are great tools for things like these tails. And with the added choice in shape and size i'm not so limited anymore into what i can cut. Here you see the top of the tails, something that's not possible anymore once they will be covered supporting the table top. (why do I bother then!?!? Cos I'm crazy I guess?)
I would like your opinion
I pre assembled the pieces, just for fun and to see if and where more work is needed. A good friend of mine pointed out to me how nice the contrast is between the detailing and the smooth skin.
It has made me doubt... so much so that i wonder what to do. And now is the time to think about it cos the surface is still untouched so the option to leave 'm out is still there. My question to you is; what is your opinion, how do you think about it. Shall I leave 'm as they are and just finish assembling? Or shall I ad the scales to add interest, just like these "mythical dolphins" always seem to have in real-life, large original furniture?
ps. Another job that still needs doing; taking out the warp in the marble top. In the picture above you can clearly see the cracks on the left and right hand side of the table top, showing how much curve can occur in a slab of thinly cut stone :( I believe it happened because my workshop is unheated and past winter is to blame. I thought I would let you know, so you can all be aware; marble seems to be just a sensitive to climate conditions as wood.
top & bottom
Last week I've finished the underside of the table top. I messed up making the base part of the table and that gave me the opportunity to make an even better one. Wasn't pleased with it anyway so I'm glad I made a miss. Now the grain of the wood runs along all 4 sides, just like the top. Not only does it look sooo much better, it eliminates the flaw of a far more darkened end grain.
I've used the failed piece to figure out the loose ends of the design for the bottom and finished it this weekend. Oiled them both with one coat of Danish oil to bring out the grain. Once it's all assembled it will be waxed to give it that satin shine I love so much. All that's left is (what I feel will be) the real challenge of this table; scaling the fish...
Enjoy the last day of Easter,
Hit & MIss
I finished the table top last weekend and I started on the base. It will have the same molding as the top, only reverse, and a little bit more. I used a basic router table that will hold a drill-motor underneath. Using various router bits (square, curved or concave) you can build up any shape of molding you desire. Taking little cuts each time you pass the wood. Slowly raising and adjusting the bit with each pass as not to force too much on the wood or burn the bit. Then changing the router bit for another shaped cutter, adjusting and continue the passes.
In the end I probably did each side of the wood maybe 7 or 8 times? So 30-something in total?
And guess what? On the last run... I missed.
It happened late at night, after working on it for a while and wanting it finished, ready for carving. And although i keep telling myself to stop working on miniatures when i feel i get tiered and loose focus, I can't seem to... :) I'm too eager to work on this table. So i don't mind, cos Hey!! I'll just make a second base :D But i thought I'll show you what can happen if you let wisdom and sensibility floating out of the window... you miss!
Have a great Easter Weekend,
table top
A Mom knows her twins
Some of you have asked me how you can carve two identical pieces. How can you carve them separately but still end up with two of the same looking objects?
The only way to do it is to carve them both at the same time. Do it simultaneously. Just start with two roughly cut out pieces of wood. Changes are one is slightly different then the other. See where they differ and use coarse tools like files or chisels to make the rough shapes equal. Even measure up the dimensions if you don't trust your eyes. It's very important you start out with 2 pieces that are the same size and shape, even at this rough stage.
As you start to reveal the shape you desire, you slowly take little chips of wood away. But the clue when carving simultaneously is to do just little at a time! When you've done a section on the first piece just lay it down and pick up the other piece to do that same section. Again taking away as much (or should i say as little?) as you did on the first piece. When you think you're done, pick 'm both up to compare and when you feel one is a bit "out" of the other, this is the time to make sure you correct that. Only when you are happy that they are equal, can you proceed to carve a bit further on the shape. If you're not careful, a slight change in shape will become more and more visible as you reach the end. So be sure to take little steps at a time because then it's far more easier to keep both pieces the same shape. So you can end up with twins :)

This is the way i proceeded on these two dolphins. I mentioned the photo album before, but in it you can actually see and follow the step by step progress of what i just described. Still a lot to do but the heads are roughly finished now. Although I'm proud to say they do look a lot alike... I can easily tell them apart. I've held them up close for so long that it almost feels like being a Mom of twins. Every one is confused who is who, except their Mom. They both have their own character :D
The only way to do it is to carve them both at the same time. Do it simultaneously. Just start with two roughly cut out pieces of wood. Changes are one is slightly different then the other. See where they differ and use coarse tools like files or chisels to make the rough shapes equal. Even measure up the dimensions if you don't trust your eyes. It's very important you start out with 2 pieces that are the same size and shape, even at this rough stage.
As you start to reveal the shape you desire, you slowly take little chips of wood away. But the clue when carving simultaneously is to do just little at a time! When you've done a section on the first piece just lay it down and pick up the other piece to do that same section. Again taking away as much (or should i say as little?) as you did on the first piece. When you think you're done, pick 'm both up to compare and when you feel one is a bit "out" of the other, this is the time to make sure you correct that. Only when you are happy that they are equal, can you proceed to carve a bit further on the shape. If you're not careful, a slight change in shape will become more and more visible as you reach the end. So be sure to take little steps at a time because then it's far more easier to keep both pieces the same shape. So you can end up with twins :)
This is the way i proceeded on these two dolphins. I mentioned the photo album before, but in it you can actually see and follow the step by step progress of what i just described. Still a lot to do but the heads are roughly finished now. Although I'm proud to say they do look a lot alike... I can easily tell them apart. I've held them up close for so long that it almost feels like being a Mom of twins. Every one is confused who is who, except their Mom. They both have their own character :D
The tools I've used so far are nothing fancy. My two favorite ones are a scalpel #3 with a straight blade #11, and the one i use most, scalpel #4 with blade # 23, all from Swann Morton. The last one has a very nice curve to the blade, that makes it really easy to cut and carve through hard woods. Beside these knifes that do the most part, I used a few gouges, ranging from 0.5 till 3 mm.
like a fish in the water
Sorry i've not posted much lately. It's not that I haven't been busy. Actually, I've been busy a bit too much i guess? But no time for excuses, here's what's i've been working on when it comes to miniatures. A free standing side table.
I was figuring what sort of base to make for it and when i thought about turtles, sea turtles came to mind. Then it struck me all of a sudden. Why not go for a nautical theme? As I researched museum pieces and antique dealers while at the same time keeping shells and fish in the back of my mind i discovered a returning theme, magical dolphins. Often made in guild wood, and very popular in the mid 19th Century. Here are a few examples,
As you can see they can consist of just a single fish or 2 intertwining. Even 3, just curving around them selfs. All these varieties offered me the freedom to create a design of my own. Sketching and looking for the "right feel" i ended up with 2 Symmetrical intertwining dolphins. Then I made a clay model to get an even better feel for the shape and curves, and to see where the challenges would lie. Doing so i discovered that carving some of the inner shapes would be next to impossible. Cos both fish would be identical i decided to cut them out separate but simultaneously. So I made side views and cut the rough shapes out of solid pear. Lovely wood to work with. If you want to, you can check out all different stages here, in one of my albums, cos otherwise it would be way too many photographs.
It's now at this stage that it's ready for detailing, a very time consuming process. And even though my eyes need more and more (day) light as they grow older (don't all miniaturists suffer from it???) i feel like a fish in the water. Because spring has arrived, the back garden is bathing in sunlight. And I can't think of no better spot to carve...
Enjoy your weekend
Last autumn I've bought a few pieces of real marble table tops at a dollhouse show and this is just one of them. I really loved its shape and the way its build up with all these different colored chunks. It reminded me somewhat of tortoise shell?
I was figuring what sort of base to make for it and when i thought about turtles, sea turtles came to mind. Then it struck me all of a sudden. Why not go for a nautical theme? As I researched museum pieces and antique dealers while at the same time keeping shells and fish in the back of my mind i discovered a returning theme, magical dolphins. Often made in guild wood, and very popular in the mid 19th Century. Here are a few examples,
As you can see they can consist of just a single fish or 2 intertwining. Even 3, just curving around them selfs. All these varieties offered me the freedom to create a design of my own. Sketching and looking for the "right feel" i ended up with 2 Symmetrical intertwining dolphins. Then I made a clay model to get an even better feel for the shape and curves, and to see where the challenges would lie. Doing so i discovered that carving some of the inner shapes would be next to impossible. Cos both fish would be identical i decided to cut them out separate but simultaneously. So I made side views and cut the rough shapes out of solid pear. Lovely wood to work with. If you want to, you can check out all different stages here, in one of my albums, cos otherwise it would be way too many photographs.
It's now at this stage that it's ready for detailing, a very time consuming process. And even though my eyes need more and more (day) light as they grow older (don't all miniaturists suffer from it???) i feel like a fish in the water. Because spring has arrived, the back garden is bathing in sunlight. And I can't think of no better spot to carve...
Enjoy your weekend
Subscribe to:
Posts (Atom)